Welcome! If you have found this post through a forum or website, please leave a comment & let me know where you came from. Check out the rest of my blog for giveaways & other sweet stuff.
This post will mainly be a photo tutorial, click on any picture to make it larger. If you have any questions, let me know.
Supplies/Tools Needed
- 1 pillowcase
- bias tape (optional, you can also use the extra pillow case for this)
- elastic
- safety pins
- scissors
- measuring tape
First measure you child. You will need to measure across the chest. You will also need to measure the length that you want the dress to be. This measurement is from the chest to knee or mid calf. (ie. Hatties measurements are: chest – 6 inches, length – 20 inches.) The chest measurement is for the elastic.
Standard (American) Dress Lengths for Little Girls
6 – 9 months: 14 inches
12 months: 15.5 inches
18 months: 17.5 inches
2T: 19.5 inches
3T: 21 inches
4T: 22 inches
5/6: 24 inches
7/8: 26 inches
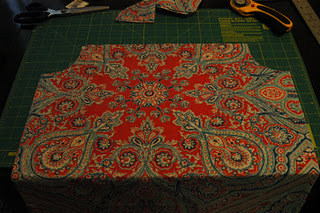
Next you will cut the pillowcase. When you cut acroos the top of the pillowcase (i.e. lenght), add an inch to the length for your casing fold. For the arm holes cut a ‘J’ edge, along the side seams, that is about 3 – 4 inches high/3 – 4 inches wide. 
If you want to make your own bias tape from the pillow case selvage, you should cut that now. For a 1/2 inch bias tape, you need to cut 2 1/2 inch strips. Cut two strips.

Next you will iron the casing for the elastic in the front & back of the pillow case. Starting at the raw edge, iron a 1/4 inch fold then fold & iron a 3/4 inch fold.

Finally sew the casing closed. Sew as close to the edge as possible, leaving a 3/4 inch casing. This step does not have to be perfect. The roaching from the elastic will hide a multitude of mistakes.
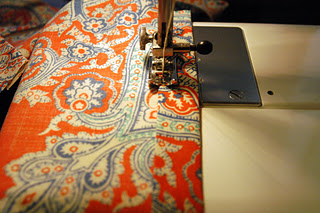
Now while you have the iron out, iron the bias tape. This is how I make bias tape, if you make it differently, make it how you usually make it. 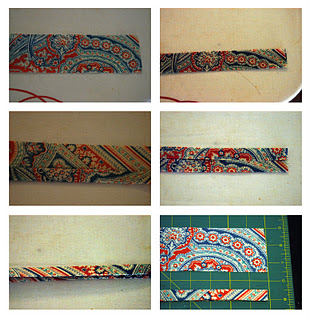
First Iron in half, open. Then iron both raw edges to the center. Finally fold & iron in half again.
Your project should now look like this.
Now you will feed the casing with elastic. You will want to cut the elastic the length of the chest minus 1/2 inch. You will need 2 pieces of elastic the same length. Attach a safety pin to either end of the elastic for feeding purposes.

Feed the elastic through the casing. Then sew all four raw edges of casing, sewing the elastic into the casing.
Now pin the bias tape to both arm edges.
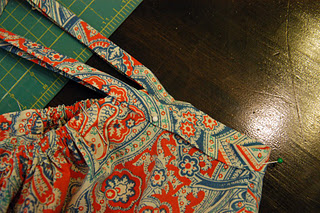
Starting at the edge of the bias tape, begin sewing the tape closed. Continue sewing closing the dress in the tape. Make sure you give yourself enough room to catch both edges.
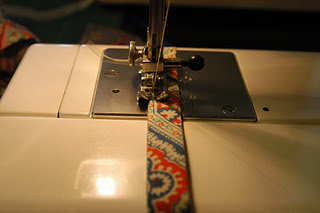
Finish off the bias tape by using your button hole stitch on the diagonal.
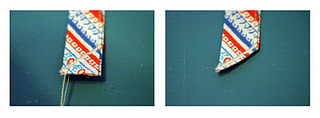
Snip all of your seams. Viola, finished dress.

For personal use only.


oh, i need a little girl..
ps... What's a girl got to do to get an invite to read your other blog...?
I saw how you made these when your neices all came to church matching and then to nursery where I carefully examined how you did it. They are so stinking cute. My girls wore them just about everyday this summer. I even made myself one to use as a cover-up at the pool!
Thanks for the wonderful tutorial.
~Jesslyn from Malaysia
Thanks!
found you thru a link posted here:
http://shestories.blogspot.com/2009/02/ive-been-crafting.html
This is one of the cuter pillowcase dresses I've seen! Thanks for the tutorial - yours was the first that came up in a google search.
Best Regards,
Carol Ujan,
~ from Malaysia ~
Your fellow Utah Etsy-an,
:) Emlyn
Cheers, Andrea
I came from Allsorts - I was following Craft hope links all around :o)
Love Fat Mumma
www.fatmummas.com.au
I came from Baby Center's Crafty Sewing Moms.
Thankyou for sharing it with everyone.
*ps have emailed to the address in the top left of your page but the mail came back undeliverable :)
i'm french, i have 3 children and i love sewing for us..
i don't speak english very well, sorry if you don't understand all what i say...
I like this pillowdress and thank you for the tutorial !
i think that my daughter will be so beautifull with !!!
*You should see photos of it on my blog within the next day or two. :)
Didn't read the tutorial in detail, but looks like it would be a very good resource if I'm ever in a position to make a PCD.
(I have one little boy & one on the way.) The pictures are very helpful.
I have a new web site and give away if you are interested.
http://web.me.com/knot_yembroiderylady
Thank you!
http://coopsnpeps.blogspot.com/2009/07/sewingcreating-this-week.html
cheers
Bron
ps from a google search xo
I think I googled to find you.
-Stacey
http://www.hazelmoonflyhairbows.etsy.com
http://gigglesmum-creativeheart.blogspot.com/2009/10/50-cents-pillowcase-dress.html
http://ourtaiwaneseadoption.blogspot.com/2009/09/pillowcase-dress-patterns-and-food.html
found that link through a google search.
Thanks for your imput ant tutorial!
I googled "pillowcase dress" and found you...just wanted to share it on my blog!
thanks!
I googled "Pillowcase dress" and I found your site most helpful. I am going to look for some pillowcases to make my 3 little girls matching ones :) Thanks so much for the tutorial!!
~Jacci in Ohio
Kind of a round about, but I have passed on the tutorial link to the Quiltsy Team on Etsy, so those who are interested can see it.
Have already made many of these using you tutorial for Real Hope for Haiti. Have passed on a link to your page for many more making dresses for RHFH http://haitirescuecenter.wordpress.com/
Thanks so much for sharing your clear and helpful instructions!
Ps - we found that sewing the pillowcases in a bit for the smaller sizes worked well for the Haitian babies and toddlers.
Christi - Sacramento CA.
We are going to make these to send to girls in Lesotho, Africa. Susan's Kids is filling a container with new and gently used clothes, shoes, books, school materials, hygiene items, etc to distribute to 8,000 children in 71 villages. Many of these children have never owned new clothes.I know the girls in Lesotho, Africa will adore these dresses that were handmade with love just for them.
http://freshlypicked.blogspot.com/2008/03/pillow-case-dress-tutorial.html
:)Carol
Tiffany
I love that these instructions have elastic at the neckline and not just the ties going thru the casing around the neck...seems like a choking hazard to me!
OH I came across these by typing "Pillowcase Dress Instructions" into Google...yours was the 2nd or 3rd link.
http://athomeinabq.blogspot.com/2010/05/remnant-project-1.html
My little girl is going to be dressed out for summer:)
For those who are challenged with pulling needle and thread I design and create Vintage as well as New pillowcase dresses, plus the ever popular ACU dress for children.
Have a good day
Barbara
and informative article live here for us.high visibility clothingWe really appreciate ur effort.
Keep up the good work. . . .
Here is a link to my blog post
http://planetfriendlyhandmades.blogspot.com/2010/11/pillowcase-dress.html
http://aspiringmom2three.blogspot.com/2010/12/modified-pillowcase-dress-for-princess.html
http://mamamiamcmasters.blogspot.com/
http://sewingonsunday.blogspot.com/
My friend, Kayci gave me the link to your blog. :)
FABRICA DE ROPA INTIMA DE DAMA
Información de Inversiones en Costa Rica
Empresa dedicada a la fabricación de ropa intima de dama con gran prestigio a nivel internacional, fundada en el año 1980, constituida bajo las leyes de Costa Rica y cumple con todos los requerimientos que tanto las leyes nacionales, como los estándares de calidad exigen.
Muebles
buy codeine online
I found this article very interesting and informative!
Keep sharing!
buy vicodin online
Facebook Developer
wedding dresses
@ Vimax, VigRX Plus, Penis Enlargement, Penis Enlargement Pills
buy watson
Pingback: Goal for tomorrow? | designed by danni